Giving your ideas a concrete form


This is the last part of the 3 part article on relevance of UX to startups. We explored the need to understand the audience and define the problem space ahead of building your product in our first article. If you haven’t read the article, check it out here. In the second, we took a closer look at the need for a Design Strategy before jumping into building a prototype. You can read thearticle here, in case you missed it. In this article we outline simple processes and guidelines that can reduce risk and structure the process of building your MVP.
By the time you’ve gone through steps 1 & 2 listed here: you should have a sound understanding of your users, their behaviors, their journey within the experience you’re exploring, the problems you’ll be solving for & finally the Design principles that act as guardrails, reminding you of the original vision and experience you are designing for. With all of this in place, you’d be surprised how much quicker, easier and simpler the process of prototyping becomes.
In this article, we explore a 5 step process that can take you from all this data you’ve collected and the wealth of info you have in your head, to the blueprint for your product.
A simple scenario can help you understand the context, the elements that form a part of the experience, the emotional qualities and the flavor of the overall experience you’re designing for. So grab a pen and a paper and sketch out (or write if you’re not comfortable sketching) a scenario, a short scene describing your target consumer using your app. Consider the following:
- What are they doing (eg: just back from work, it’s 7 and they’re starving)
- Where are they (eg: half lying on the couch in their living room)
- What’s going on with them at that moment (flip open their food delivery app searching for a restaurant to catch their eye)
- How’re they feeling (eg: exhausted from work, too tired to figure out where to order food from, scroll up and down several times and can’t make up their mind, borderline frustrated)
- Enter your product
- What changes? What about your product makes them happy or solves their problem?
- Emotional state at the beginning and end. What is the user’s desired end state?
Tip: Use different colored pens or use big / caps lettering to highlight key words — emotions, place of activity, problem being solved. This will help you address / focus on them as you wireframe and also validate if the way you’ve implemented the solution achieves the person’s desired end state.
If you’re scared at this point that you don’t sketch well, take a look at this sketch and tell me you can’t do this! I’ve met several founders who’ve asked me to help them find someone who can draw up scenarios, UX folks to help them through the initial process. I’ve seen work freeze because many couldn’t find or afford folks to help them through this process. In reality, anyone can sketch or storyboard as long as they understand the key elements and the role they play in giving a concrete shape to their idea.

Every founder should sit down and spend time drawing out scenarios, defining the primary use cases that identify their features and reconcile the research and strategy they put together with the overall experience they wish to deliver to their consumers.
Once you have a good idea of the scenario you’re setting your app against and a good feel of the quality of experience you want to generate, write out all your use cases: A list from beginning to end, categorized under the main activities and the quality of those activities. It’s a simple straightforward list that goes something like this:
- Activity 1: Instant access to restaurant list on launch- One screen register and login in the beginning
- - Instant access to restaurants and food trending in a feed
- Activity 2: Access to a useful feed with user preferred foods, people & locality on top- Access to restaurants and food enjoyed by user in the past
- - Prioritize list of restaurants recently visited / recommended by friends
- Experience 3: Ability to send and accept invitations to dinner impromptu- Send & receive invitation to dinner
- - Allow group voting to pick place of choice
- Experience 4: Understand user mood and context & display relevant recommendation
Most people that build products go from idea to feature definition. Doing your use cases after you think through your scenarios and spend time studying your target, helps you realize that your product is more than the sum of it’s features. Features alone don’t make up a product. The oomph, the feel and the experience it delivers can be realized only when you understand your consumers, their contexts, their life within which your product plays a role and the emotions that are in play.
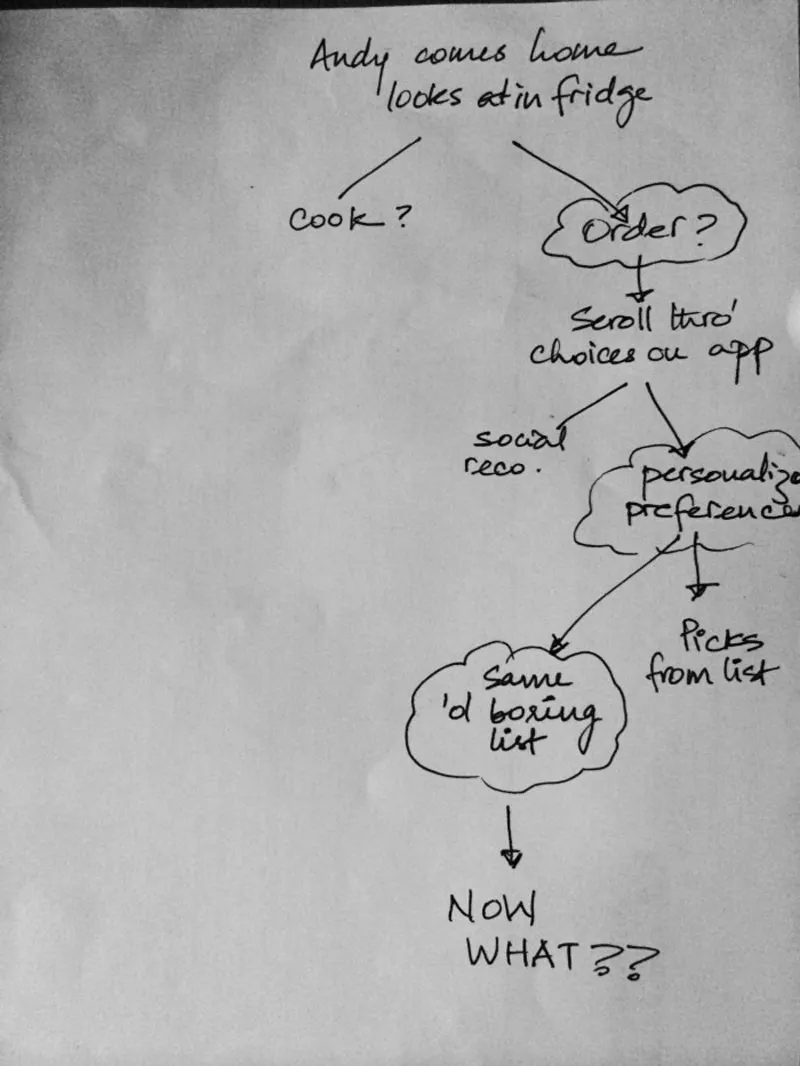
What if the user doesn’t find what she wants using your product? What happens then? This is a very important part of the process that most of us overlook in our excitement to prove the awesomeness of what we’re building. But making your product fail proof could prevent your users from leaving your product and going to a competitors. The process is simple:
Revisit your scenarios now. Make a simple flowchart (shown below). First consider failure cases, what happens if your user doesn’t find the restaurant or food of his choice (going back to the examples given above)? What options can you give them to do away with that frustration / anger? Second, consider alternate scenarios — what are some other settings when the user uses your app? What if the user has a large group of friends at home and they’re ordering food? Does the flow change? Last, walk through edge cases — are there situations that we might not expect to happen often, a rare event that requires the use of your product in a certain way? While you might not design for all of these in your MVP, having them listed and in focus will remind you of features that you have intentionally de-prioritized.
Now all you have to do, is grab a storyboard template and write / draw out what happens when the frustrated, angry person on their couch opens your app. What does ‘your product to the rescue’ look like? Draw out the experience from the time the user has a desire or a need, to the incentive they have to open the app, to login, the actions and satisfaction of completing a task or enjoying an experience. A storyboard basically imagines a person (group of people) using your app looking to solve a problem or to make their life better at that moment. Every frame shows what the user is doing, a rough high level scribble on the screen of the phone they’re holding and a little bit of the context (like words ‘hmph! to show anger and frustration on not finding what they want). At the bottom of each frame, write a short phrase describing what’s happening in that frame. Your storyboard is done, when the user successfully achieves their goal (in this example, gets their food through your app and it happens to be exactly what they want). Depending on how you prioritized your failure cases and edge cases, you can choose to storyboard them as well or not at this stage.
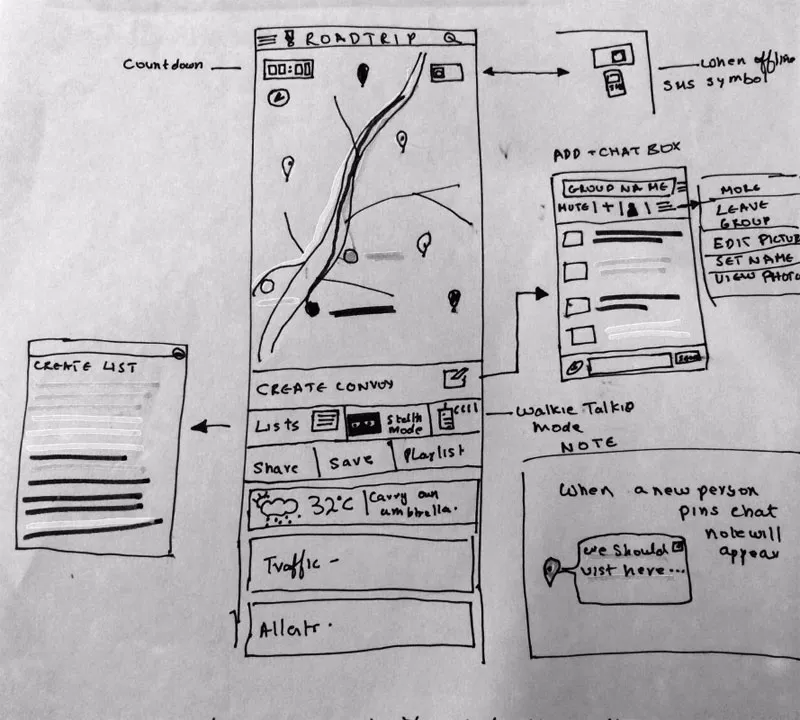
If your product is an app, there are plenty of app templates / mobile screen templates online. Pick one and start sketching. Go back to the use cases you defined and start drawing out step by step, the actions mentioned there. Cover all the features you zoned in on in each frame. Every mobile screen should show how the user interacts with the app, and the task that gets accomplished. Refer your scenarios and storyboard at regular intervals, and be honest when answering these questions:
- Does the way you’ve implemented the solution truly capture the essence of the experience you have defined. Will your user truly be happy, productive or whatever their desired experience is?
- What are a few different ways of implementing this solution? Which one is true to the Design Principles you defined in step 2 of this process?
- Which features make them want to keep coming back to your product?
Again, don’t be shy, pick up a paper and sketch away. Anyone can draw simple lines and write. The goal is to get across the point of each screen and have the wireframe help you think through the point and nature of interaction in each screen.
Iterate several times before you settle with 2 or 3 to test with people. Ensure the 2 or 3 options you have are significantly different in their approach, achieve same goals and the desired experience in different ways. This will not only give you good answers on what works but even better, it helps you understand what definitely doesn’t work. Test, Test, Test and iterate until you move to high fidelity designs.
The Design process definitely doesn’t end with wireframing. These methods don’t automatically mean you have a winning product. There are several pieces that affect the building of a startup and the UX pieces described across all these 3 articles can guide and shape them. What they do, is give you a meaningful, cohesive and holistic approach to shaping fuzzy ideas and seeing them come to life. Lastly, this is also meant to replace any in-depth lessons, workshops or hands on learning on UX but merely give you a glimpse into what UX can do for you, showing you a method to the madness.
If you’re a founder and are looking to speed up the process of going from your idea to MVP, follow this 3 part article and the methods in it. Give it a shot and tell us if it worked. We would love to hear your thoughts.